
Add Items to an Auction
There are many ways to add items as an admin from the Bid Beacon dashboard. This will guide you through all possibilities. And if you’re struggling to source high-end auction items, we can help you find the perfect travel packages for your next event. Learn more!
You have the option to add items individually, import items in bulk, or copy past items from an auction you previously managed.
From Auction Dashboard
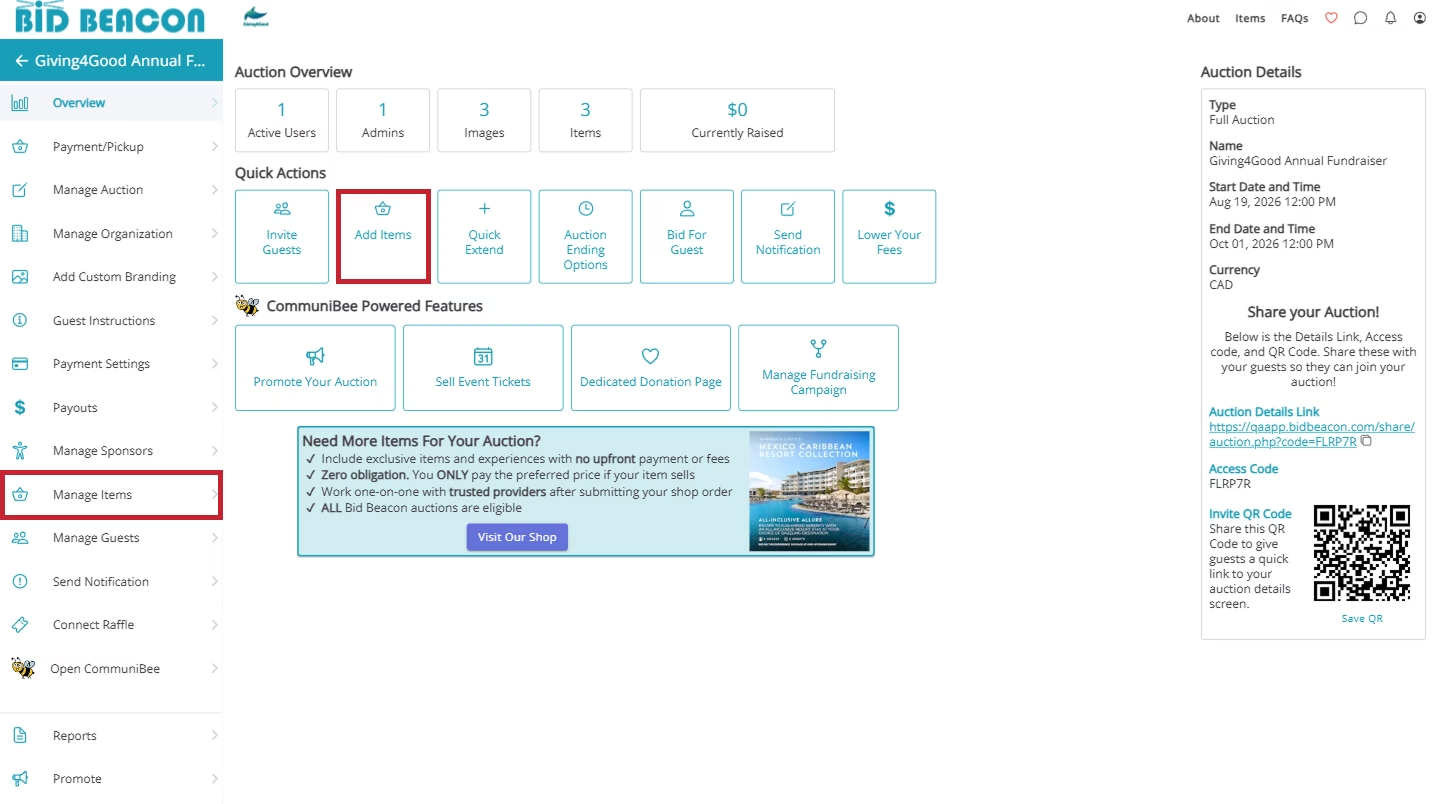
While viewing your auction’s dashboard, click the Add Items tile under Quick Actions, or click on the Manage Items tab from the left side menu.
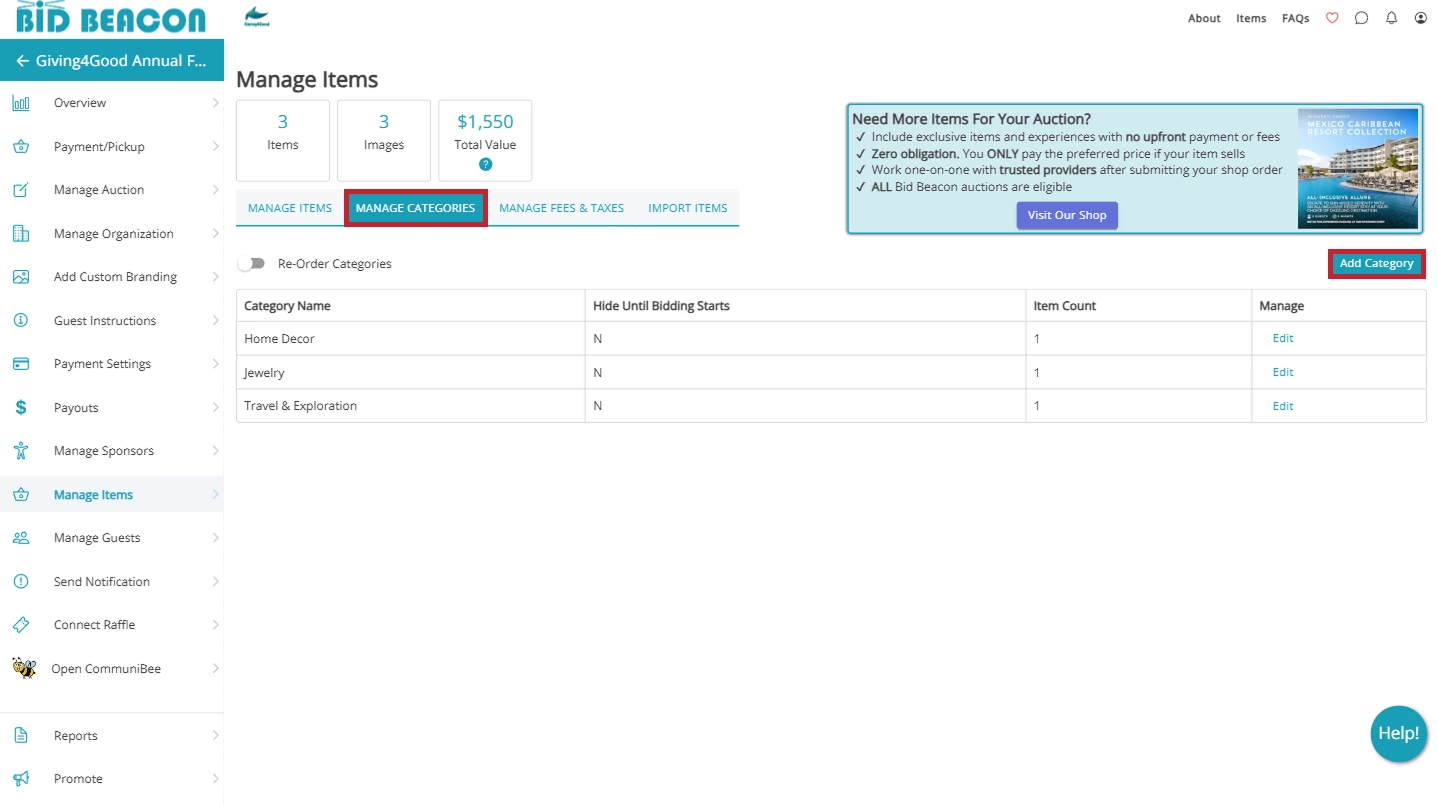
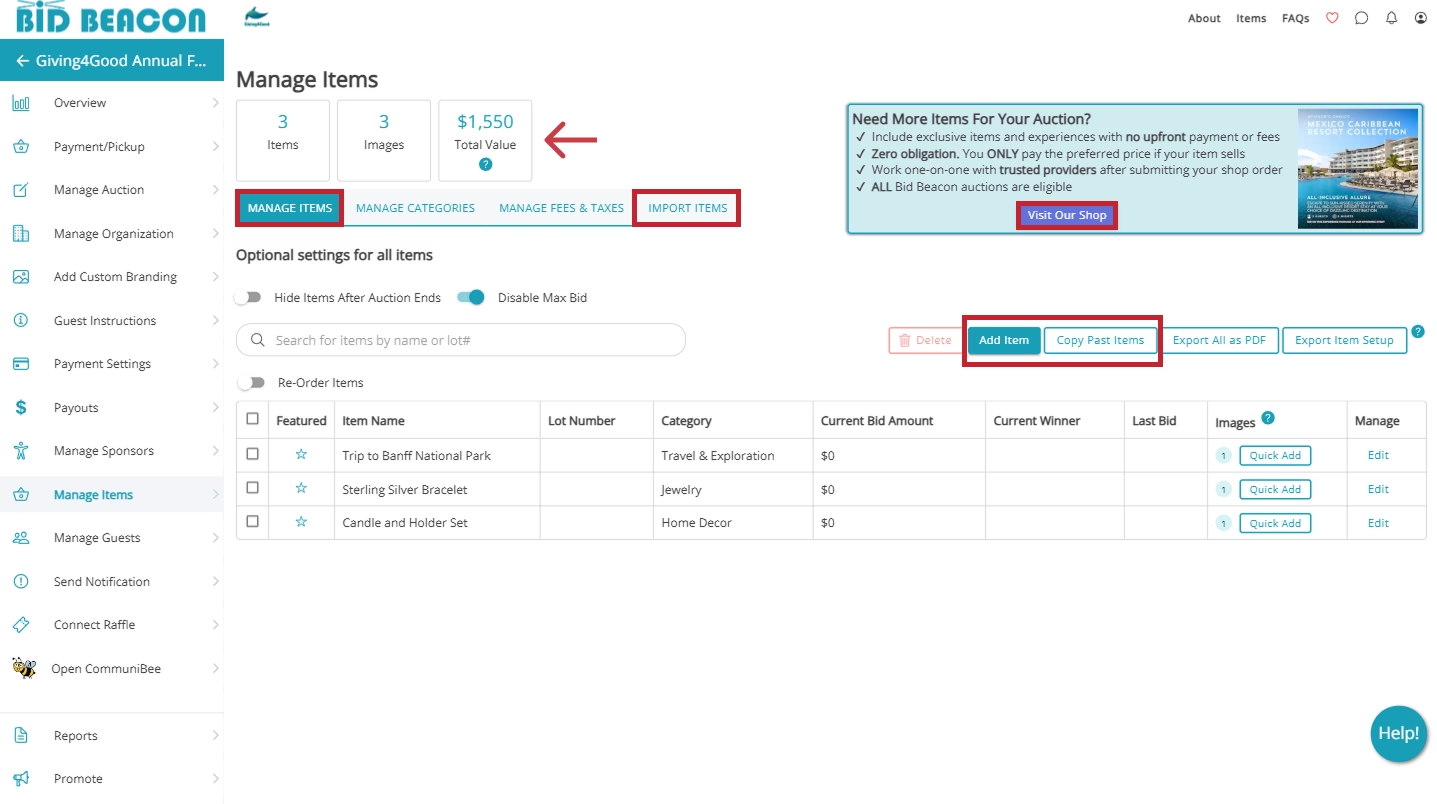
This will take you to the Manage Items screen where you can create new items by clicking on the Add Item button. You can also import items in bulk by navigating to the Import Items segment or select Copy Past Items to import items from past events.
Struggling to find items that spark excitement and bids? Bid Beacon is collaborating with Auction Packages to provide our customers with the best vacation packages. Click Visit Item Shop to learn more.
We also include a Total Value calculator. This will automatically sum up the approximate value of all your items and give you a rough estimate on what your auction might raise. If you plan on setting a fundraising goal for your auction, this is extremely useful and can help set a reasonable and achievable goal.
Additionally, you can also create and manage item categories by clicking on the Manage Categories segment. Next to that, you can also manages fees & taxes which will be covered down below.
From Auction
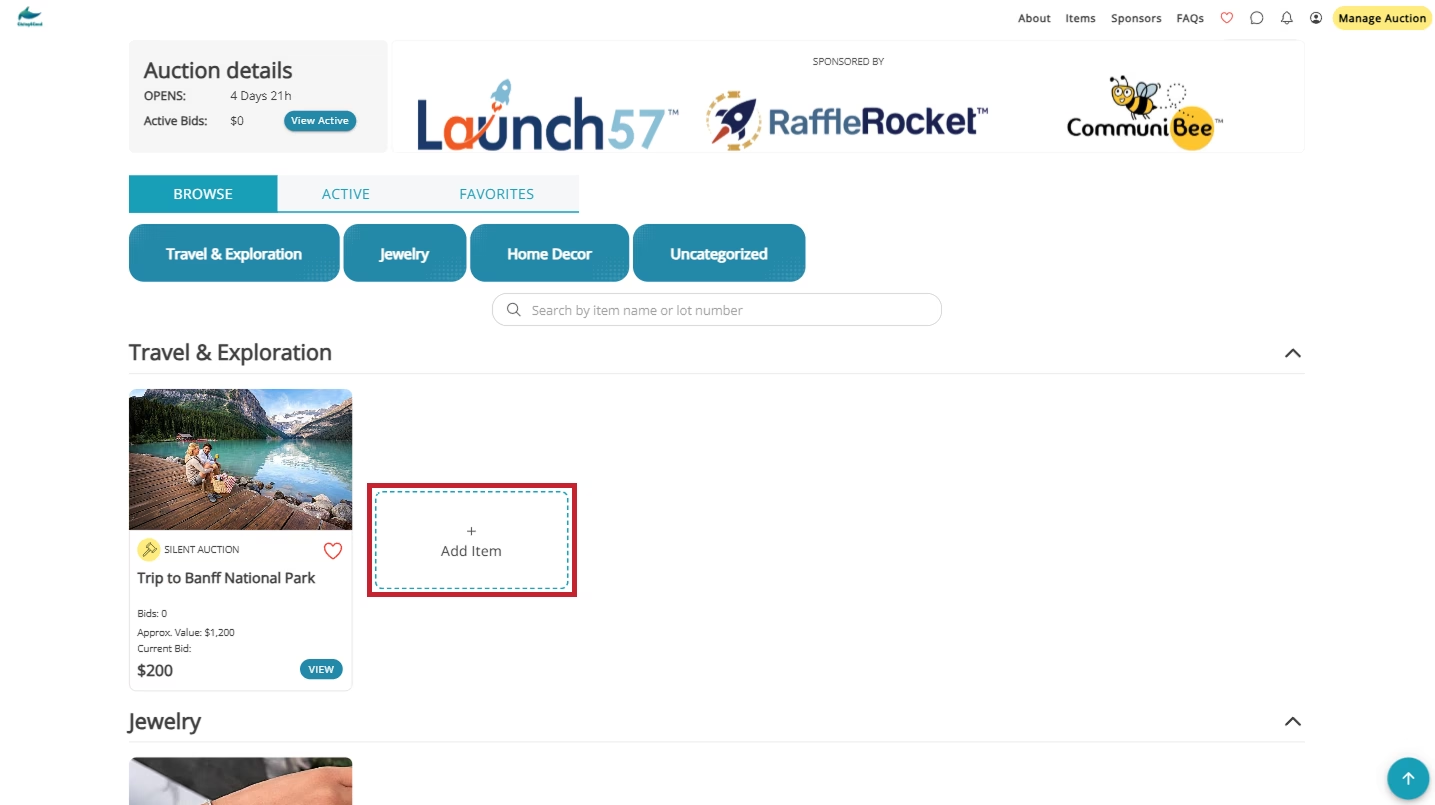
You can also add items while previewing the auction itself. If you select your auction and click on the Items tab in the header menu, you can see your auction’s Item page.
Click on the Add Item box shown above.
Add New Item
Fill in all desired fields within the sections listed below.
Click [+expand] and [-collapse] to open and close the available sections.
Images/Media
Click Browse and select one or more images to upload. There are no limits on the total number of images an item can have, but note that you can only upload 10 images at a time, and the maximum file size for each image is 10 MB.
When uploading multiple images at once, they will be ordered alphabetically by file name. If you’d prefer to change this, use the Reorder toggle to arrange your images in a desired order.
Optionally, you can include a YouTube video link directly on the item’s page.
Click Save as you go, or after filling in all five fields
*We recommend you always include at least one image per item
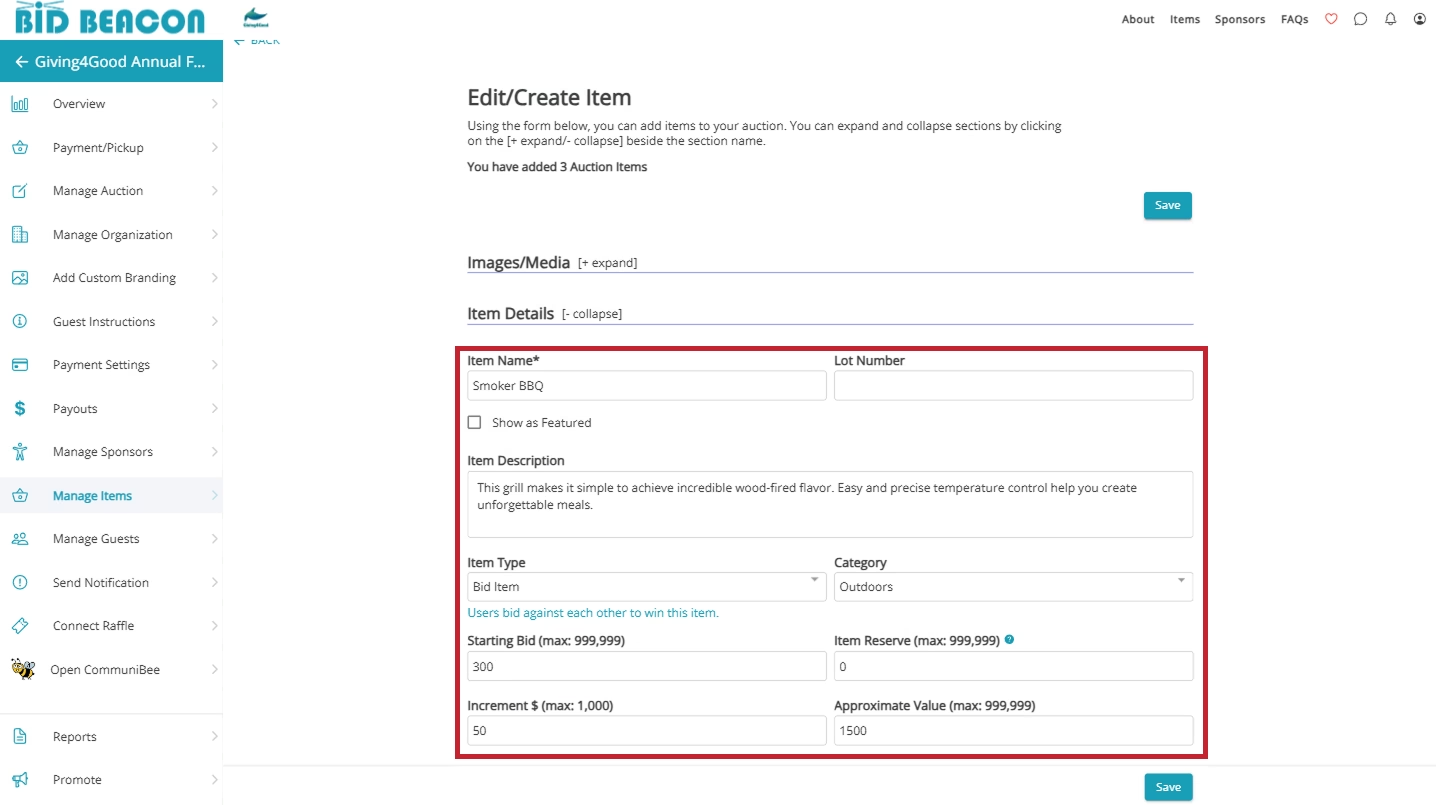
Item Details
Enter in the Item Name. *mandatory field
Optionally, include a Lot Number to help stay organized and manage your items as they close or once your event ends.
Check off Show as Featured to make the item always appear on your auction’s Details page. A maximum of five items can be featured at a time. If no items are set to be featured, your details page will show up to five items in a randomized order.
Add an Item Description so that guests know exactly what they will be bidding on!
Choose from Item Type dropdown
- Bid Item – Guests place bids in increments, highest bidder at the end wins.
- Blind Bid – Guests put their best bid forward and don’t know what others have bid. No one knows who will win until the end!
- Buy It Now – Sell items at a set price, perfect for selling merchandise.
- Donation – Give your guests a way to support your cause without needing to bid on an item. Donations are exempt from sales tax.
- Live Item – Hosting a live or hybrid event? Promote your items that will be auctioned live. Bidding occurs outside the app but once your event ends (or the item itself closes), you can input the winner on each live item to invoice them through the app.
Enter a Starting Bid ($): We recommend to start the bid at approximately 20% to 40% of the item’s retail value.
Optional: Enter Item Reserve ($): Setting a reserve will prevent the item from being won if the highest bid does not surpass the reserve amount. Guests will see a notice on the item that a reserve has been set but they won’t know the reserve price. As the admin, you can remove the reserve at any point, even after the auction ends.
Set an Increment ($): This is the minimum amount bidders must increase the bid by.
Enter Approximate Value ($): showcases the item value to your guests. This also gets added in to the Total Value calculator mentioned above. If left blank, the message defaults to say, “priceless”.
Additional Information
Paste an Information URL. This could link to additional details about the item, or if the item was donated, link to the donor’s website
Enter any Notes about the item. The text entered here does not appear on auction site as it’s for your internal use only. Great for including frequently asked questions about specific items that you, or other admins, can refer to during the auction.
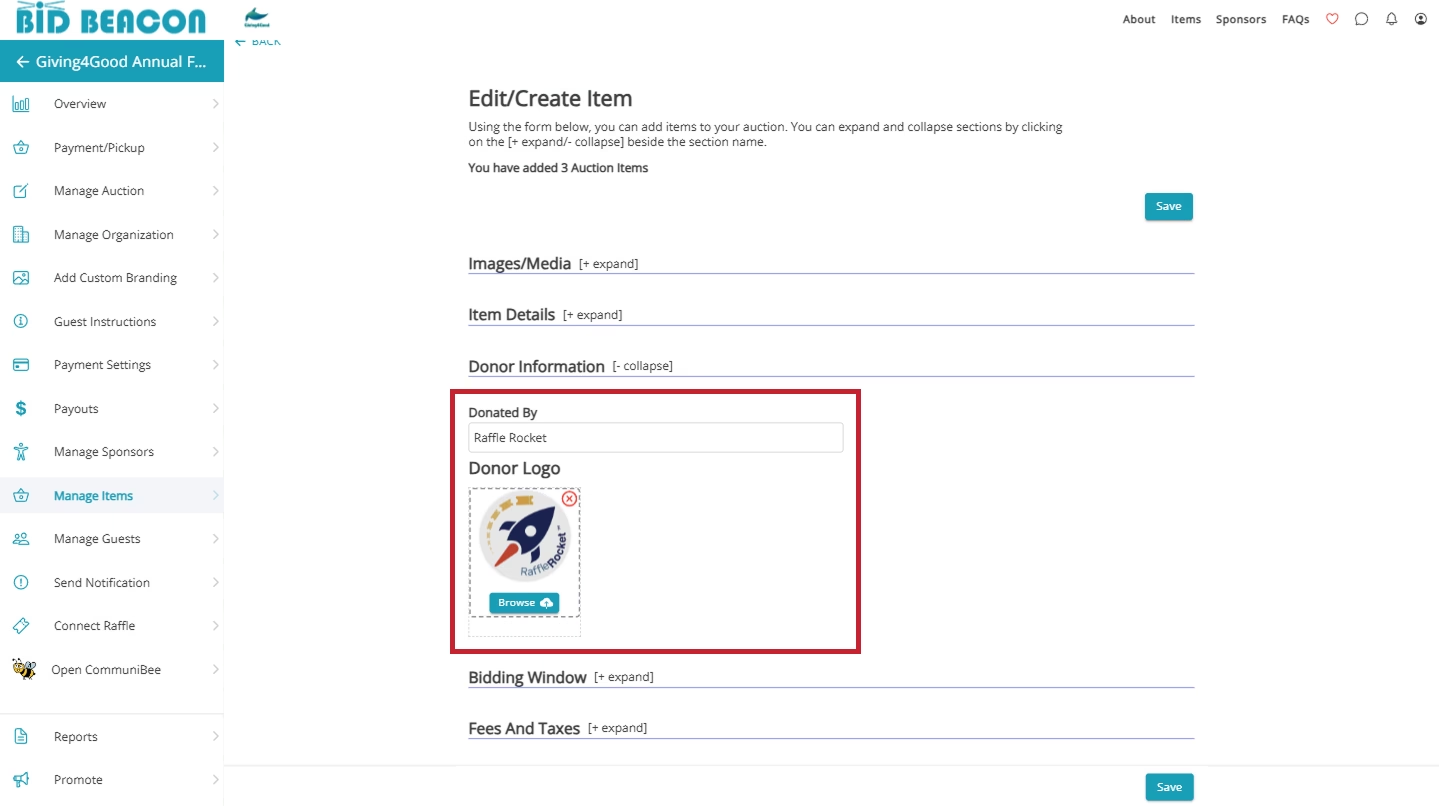
Donor Information
If you wish to recognize the person or business that donated the item, you can fill in these fields
Enter the donor’s name in the Donated By field.
Optionally, include the donor’s logo by clicking Browse and uploading an image from your device.
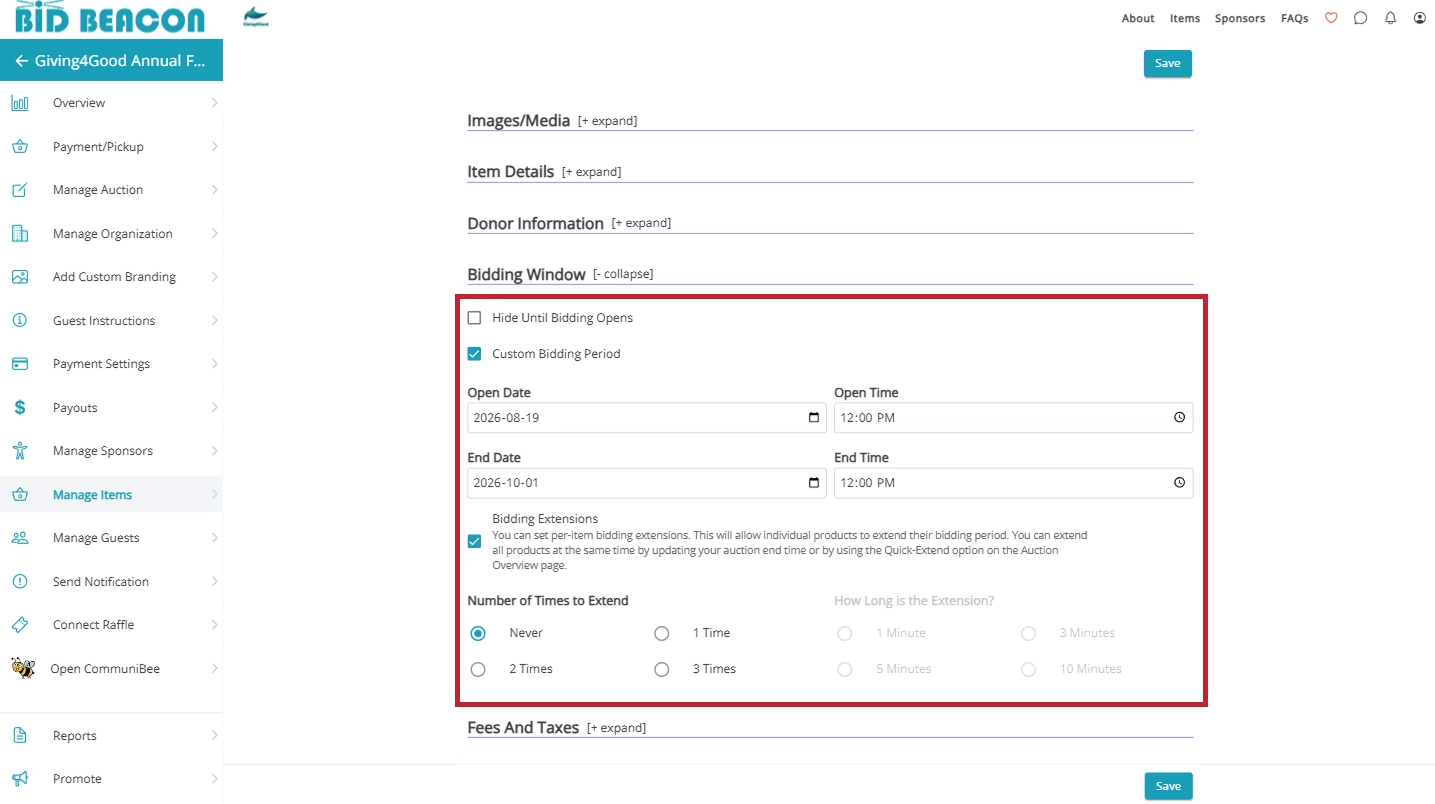
Bidding Window
Edit these settings if you want your item to open later or close earlier than your event start and end times. By default, all items open and close at the same time as your event.
Check off Hide Until Bidding Opens if you don’t want guests to be able to see items before your event starts.
Select Custom Bidding Period if you want the item to open later or close earlier than the start/end times for your overall event.
Select Bidding Extensions if you want the item to extend by a set amount of time if a bid is placed in the final 30 second. You can customize the amount of extensions, and how long each extension lasts.
Keep in mind that these settings apply to this item only.
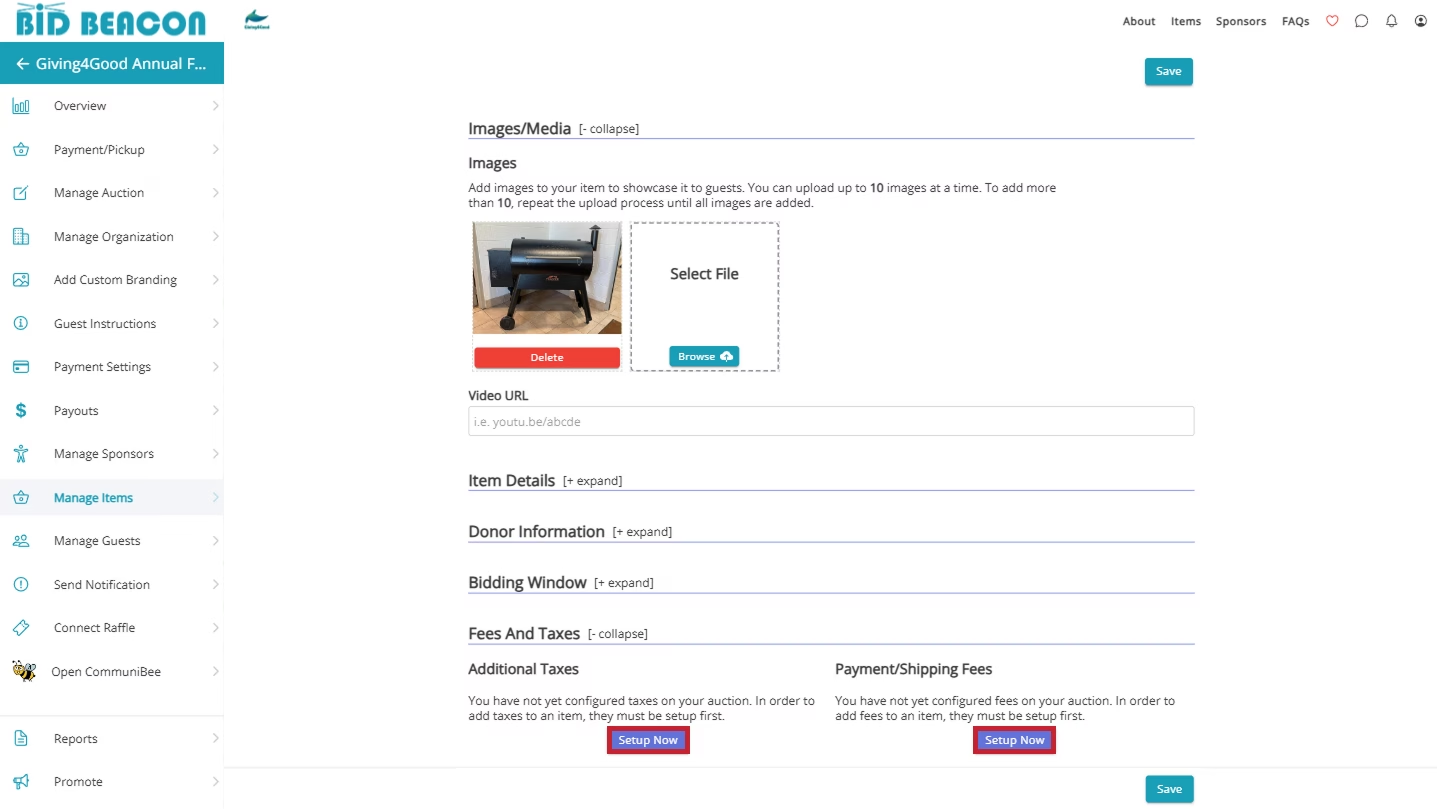
Fees and Taxes
If you wish to collect taxes or apply additional fees, like a shipping cost, on your items, these buttons will take you to the manage Fees & Taxes screen (found on the Manage Items tab) where you can create these different labels.
Once you have one or more labels for fees and taxes, you can apply them to your items at your own discretion.
Import Items
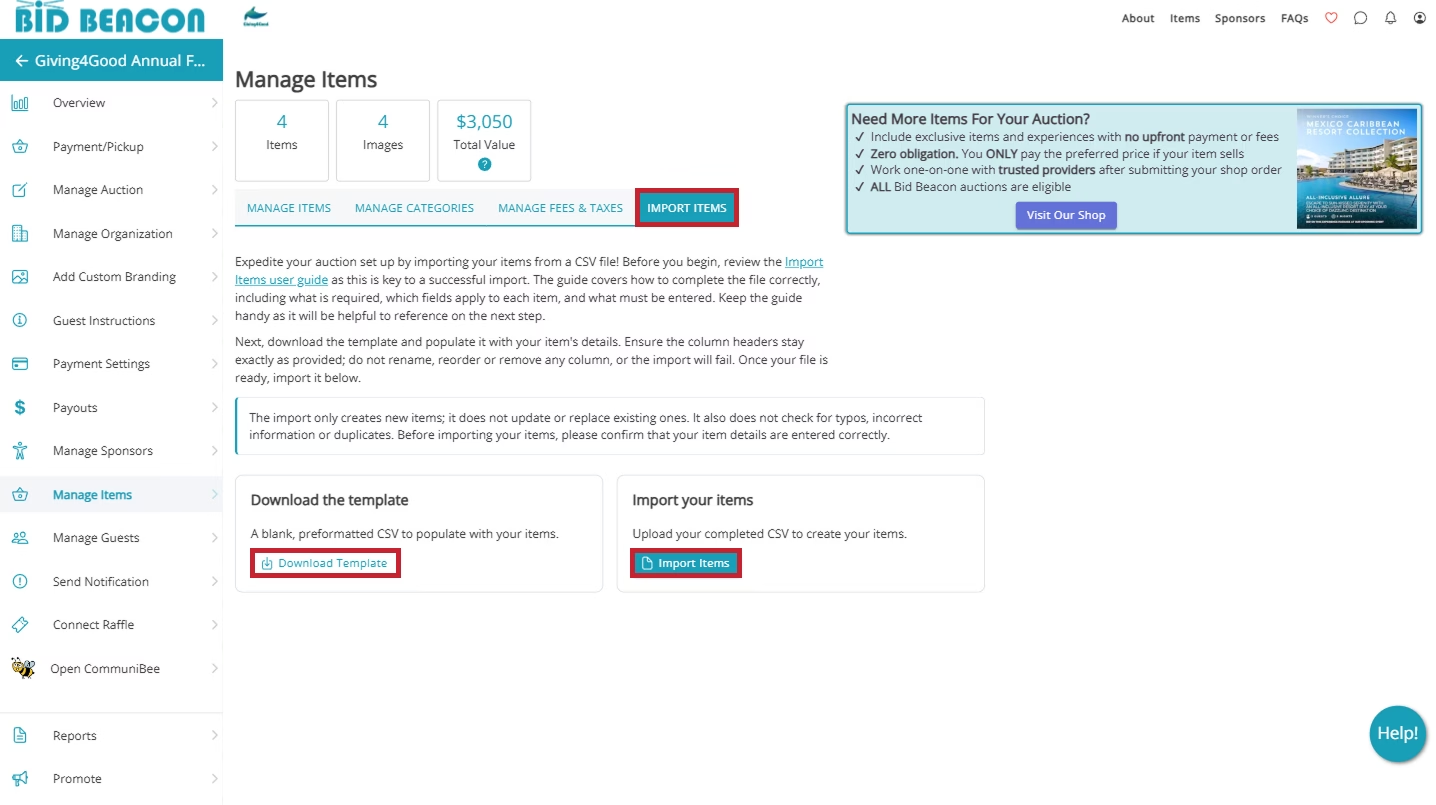
For organizations who are short on time or have a shopping list of items to upload, using the item import can save a significant amount of time. While on the Manage Items screen, click on the Import Items segment to get started.
To ensure your import runs smoothly, we offer a free import template which is a preformatted .CSV file for you to enter up to 600 item per file. Click Download Template to get your copy.
Understanding Your Import File
With the import file template, please do not change the following details as these will impact your import:
- Column order
- Column headings
- .CSV file type
The order of items and categories within your import file will carry over into your auction, but you can rearrange both after your import is successful. Depending on the item types you are importing, some columns may not be necessary to fill in.
For more detail on the applicable columns by item type, reference the tabs below.
Using Mac?
For those using a Mac device, the downloaded template may open in your Numbers app. If you prefer working in this app, you can use it to fill in the template with your items. Before importing though, you must convert the Numbers file to a .CSV file.
To do this, click File > Export To > CSV > Save.
- Category: 100-character max. If blank, item will be uncategorized.
- Item Type*: Enter Bid as the value.
- Item Name*: 100-character max.
- Show as Featured: Enter Y for yes, N for no.
- Lot#: 15-character max. Leave blank if not applicable.
- Approx Value: Whole number only. Max value is 999,999. If blank, “Priceless” will show.
- Starting Bid: Whole number only. Max value is 999,999. If blank, starting bid will be 1.
- Reserve: Whole number only. Max value is 999,999. If blank, no reserve will be set.
- Increment: Whole number only. Max value is 1,000. If blank, increment will be 1.
- Description: No character limit. The only formatting allowed is line breaks.
- Donated By: No character limit.
- Hide Until Bidding Opens: Enter Y for yes, N for no.
- Bidding Period: Item Opens At: Enter YYYY-MM-DD HH:MM (24-hour, auction’s time zone). A single-digit morning hour (9:00 instead of 09:00) still imports correctly as 9:00 AM. Cannot be before the auction’s start time. If blank, bidding opens alongside the auction.
- Bidding Period: Item Closes At: Enter YYYY-MM-DD HH:MM (24-hour, auction’s time zone). A single-digit morning hour (9:00 instead of 09:00) still imports correctly as 9:00 AM. Cannot be before the auction’s start time. If blank, bidding ends alongside the auction.
- Bidding Extension: Number of Times to Extend: Enter 1, 2, or 3. If blank, no extension is applied.
- Bidding Extension: Extension Duration: Enter 1, 3, 5, or 10. If blank, no extension is applied.
- Video URL: No character limit.
- Info URL: No character limit.
- Internal Notes: 500-character max
- Tax1: Taxes must be configured in the auction prior to importing. If tax is configured, enter Y or leave blank for yes, enter N for no if tax should be excluded on an item.
- Tax2: Taxes must be configured in the auction prior to importing. If tax is configured, enter Y or leave blank for yes, enter N for no if tax should be excluded on an item.
- Fee1: Whole number only. Max value is 999. If blank, Fee1 will not apply.
- Fee2: Whole number only. Max value is 999. If blank, Fee2 will not apply.
- Category: 100-character max. If blank, item will be uncategorized.
- Item Type*: Enter Blind Bid as the value.
- Item Name*: 100-character max.
- Show as Featured: Enter Y for yes, N for no.
- Lot#: 15-character max. Leave blank if not applicable.
- Approx Value: Whole number only. Max value is 999,999. If blank, “Priceless” will show.
- Reserve: Whole number only. Max value is 999,999. If blank, no reserve will be set.
- Description: No character limit. The only formatting allowed is line breaks.
- Donated By: No character limit.
- Hide Until Bidding Opens: Enter Y for yes, N for no.
- Bidding Period: Item Opens At: Enter YYYY-MM-DD HH:MM (24-hour, auction’s time zone). A single-digit morning hour (9:00 instead of 09:00) still imports correctly as 9:00 AM. Cannot be before the auction’s start time. If blank, bidding opens alongside the auction.
- Bidding Period: Item Closes At: Enter YYYY-MM-DD HH:MM (24-hour, auction’s time zone). A single-digit morning hour (9:00 instead of 09:00) still imports correctly as 9:00 AM. Cannot be before the auction’s start time. If blank, bidding ends alongside the auction.
- Bidding Extension: Number of Times to Extend: Enter 1, 2, or 3. If blank, no extension is applied.
- Bidding Extension: Extension Duration: Enter 1, 3, 5, or 10. If blank, no extension is applied.
- Video URL: No character limit.
- Info URL: No character limit.
- Internal Notes: 500-character max
- Tax1: Taxes must be configured in the auction prior to importing. If tax is configured, enter Y or leave blank for yes, enter N for no if tax should be excluded on an item.
- Tax2: Taxes must be configured in the auction prior to importing. If tax is configured, enter Y or leave blank for yes, enter N for no if tax should be excluded on an item.
- Fee1: Whole number only. Max value is 999. If blank, Fee1 will not apply.
- Fee2: Whole number only. Max value is 999. If blank, Fee2 will not apply.
- Category: 100-character max. If blank, item will be uncategorized.
- Item Type*: Enter Buy It Now as the value.
- Item Name*: 100-character max.
- Show as Featured: Enter Y for yes, N for no.
- Lot#: 15-character max. Leave blank if not applicable.
- Qty Remaining: Whole number only. Max value is 999. If blank, quantity will be 1.
- Price: Whole number only. Max value is 999,999. If blank, price will be 1.
- Description: No character limit. The only formatting allowed is line breaks.
- Donated By: No character limit.
- Hide Until Bidding Opens: Enter Y for yes, N for no.
- Bidding Period: Item Opens At: Enter YYYY-MM-DD HH:MM (24-hour, auction’s time zone). A single-digit morning hour (9:00 instead of 09:00) still imports correctly as 9:00 AM. Cannot be before the auction’s start time. If blank, bidding opens alongside the auction.
- Bidding Period: Item Closes At: Enter YYYY-MM-DD HH:MM (24-hour, auction’s time zone). A single-digit morning hour (9:00 instead of 09:00) still imports correctly as 9:00 AM. Cannot be before the auction’s start time. If blank, bidding ends alongside the auction.
- Bidding Extension: Number of Times to Extend: Enter 1, 2, or 3. If blank, no extension is applied.
- Bidding Extension: Extension Duration: Enter 1, 3, 5, or 10. If blank, no extension is applied.
- Video URL: No character limit.
- Info URL: No character limit.
- Internal Notes: 500-character max
- Tax1: Taxes must be configured in the auction prior to importing. If tax is configured, enter Y or leave blank for yes, enter N for no if tax should be excluded on an item.
- Tax2: Taxes must be configured in the auction prior to importing. If tax is configured, enter Y or leave blank for yes, enter N for no if tax should be excluded on an item.
- Fee1: Whole number only. Max value is 999. If blank, Fee1 will not apply.
- Fee2: Whole number only. Max value is 999. If blank, Fee2 will not apply.
- Category: 100-character max. If blank, item will be uncategorized.
- Item Type*: Enter Donation as the value.
- Item Name*: 100-character max.
- Show as Featured: Enter Y for yes, N for no.
- Lot#: 15-character max. Leave blank if not applicable.
- Increment: Whole number only. Max value is 1,000. If blank, increment will be 1.
- Price: Whole number only. Max value is 999,999. If blank, price will be 1.
- Description: No character limit. The only formatting allowed is line breaks.
- Donated By: No character limit.
- Hide Until Bidding Opens: Enter Y for yes, N for no.
- Bidding Period: Item Opens At: Enter YYYY-MM-DD HH:MM (24-hour, auction’s time zone). A single-digit morning hour (9:00 instead of 09:00) still imports correctly as 9:00 AM. Cannot be before the auction’s start time. If blank, bidding opens alongside the auction.
- Bidding Period: Item Closes At: Enter YYYY-MM-DD HH:MM (24-hour, auction’s time zone). A single-digit morning hour (9:00 instead of 09:00) still imports correctly as 9:00 AM. Cannot be before the auction’s start time. If blank, bidding ends alongside the auction.
- Bidding Extension: Number of Times to Extend: Enter 1, 2, or 3. If blank, no extension is applied.
- Bidding Extension: Extension Duration: Enter 1, 3, 5, or 10. If blank, no extension is applied.
- Video URL: No character limit.
- Info URL: No character limit.
- Internal Notes: 500-character max
- Tax1: Taxes must be configured in the auction prior to importing. If tax is configured, enter Y or leave blank for yes, enter N for no if tax should be excluded on an item.
- Tax2: Taxes must be configured in the auction prior to importing. If tax is configured, enter Y or leave blank for yes, enter N for no if tax should be excluded on an item.
- Fee1: Whole number only. Max value is 999. If blank, Fee1 will not apply.
- Fee2: Whole number only. Max value is 999. If blank, Fee2 will not apply.
- Category: 100-character max. If blank, item will be uncategorized.
- Item Type*: Enter Live as the value.
- Item Name*: 100-character max.
- Show as Featured: Enter Y for yes, N for no.
- Lot#: 15-character max. Leave blank if not applicable.
- Approx Value: Whole number only. Max value is 999,999. If blank, “Priceless” will show.
- Description: No character limit. The only formatting allowed is line breaks.
- Donated By: No character limit.
- Hide Until Bidding Opens: Enter Y for yes, N for no.
- Bidding Period: Item Opens At: Enter YYYY-MM-DD HH:MM (24-hour, auction’s time zone). A single-digit morning hour (9:00 instead of 09:00) still imports correctly as 9:00 AM. Cannot be before the auction’s start time. If blank, bidding opens alongside the auction.
- Bidding Period: Item Closes At: Enter YYYY-MM-DD HH:MM (24-hour, auction’s time zone). A single-digit morning hour (9:00 instead of 09:00) still imports correctly as 9:00 AM. Cannot be before the auction’s start time. If blank, bidding ends alongside the auction.
- Bidding Extension: Number of Times to Extend: Enter 1, 2, or 3. If blank, no extension is applied.
- Bidding Extension: Extension Duration: Enter 1, 3, 5, or 10. If blank, no extension is applied.
- Video URL: No character limit.
- Info URL: No character limit.
- Internal Notes: 500-character max
- Tax1: Taxes must be configured in the auction prior to importing. If tax is configured, enter Y or leave blank for yes, enter N for no if tax should be excluded on an item.
- Tax2: Taxes must be configured in the auction prior to importing. If tax is configured, enter Y or leave blank for yes, enter N for no if tax should be excluded on an item.
- Fee1: Whole number only. Max value is 999. If blank, Fee1 will not apply.
- Fee2: Whole number only. Max value is 999. If blank, Fee2 will not apply.
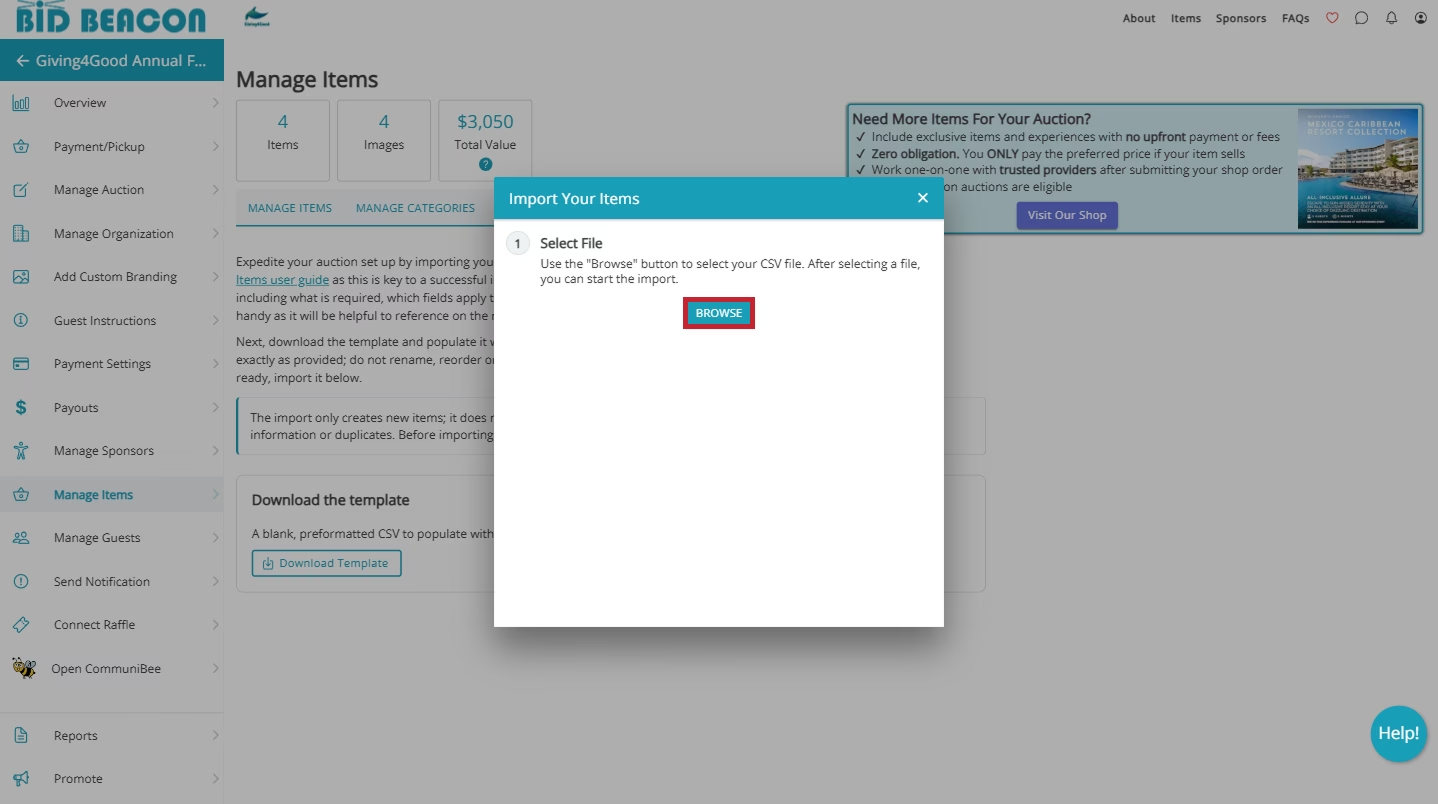
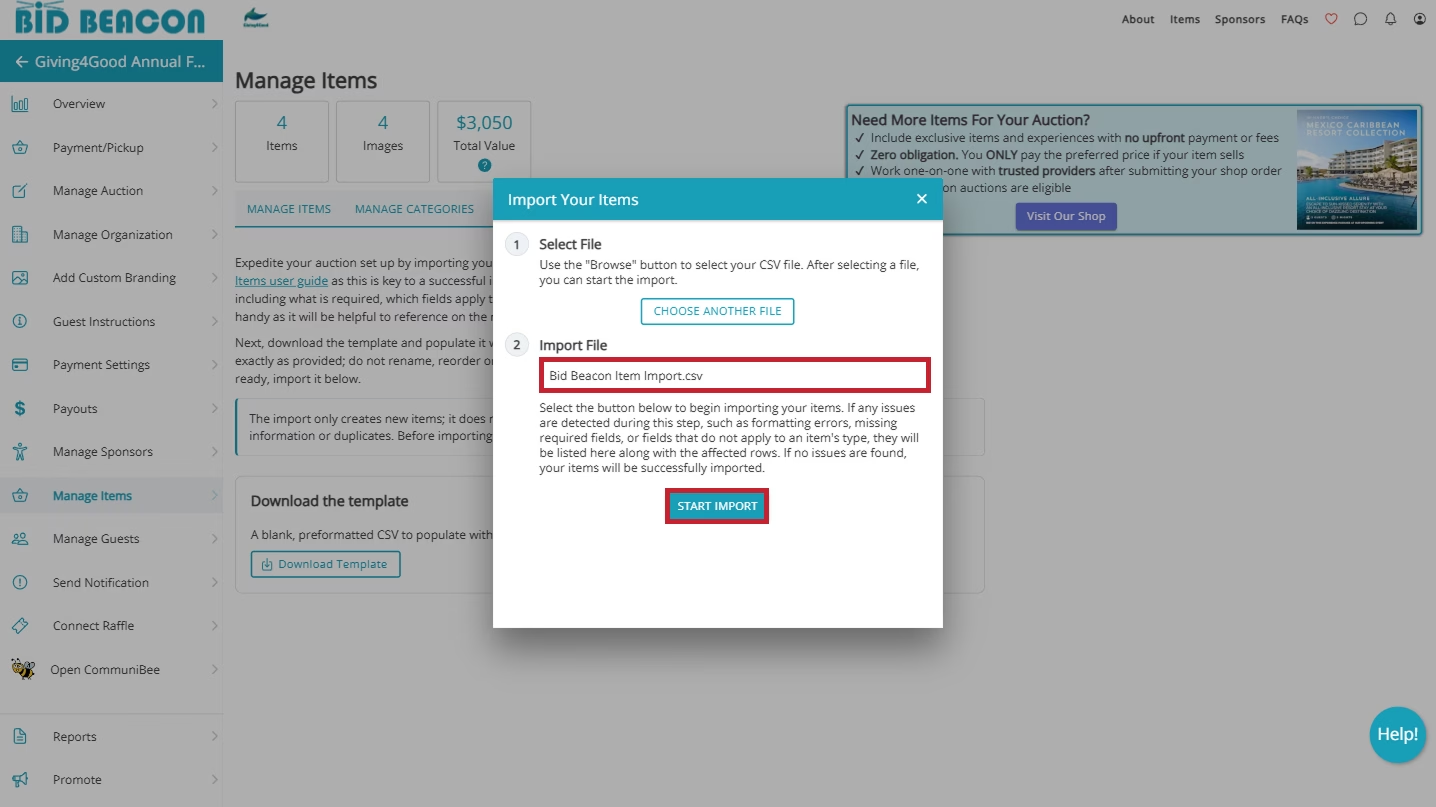
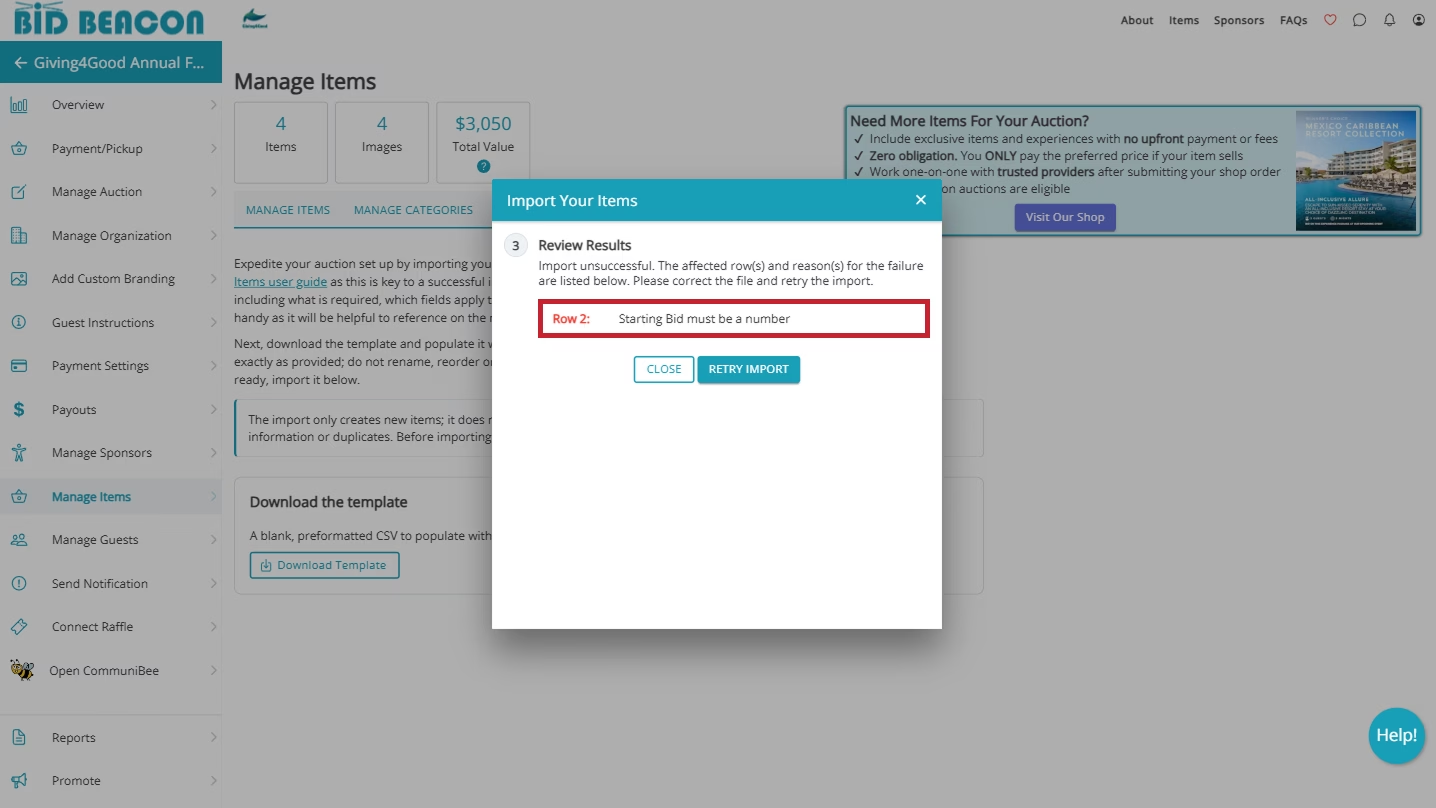
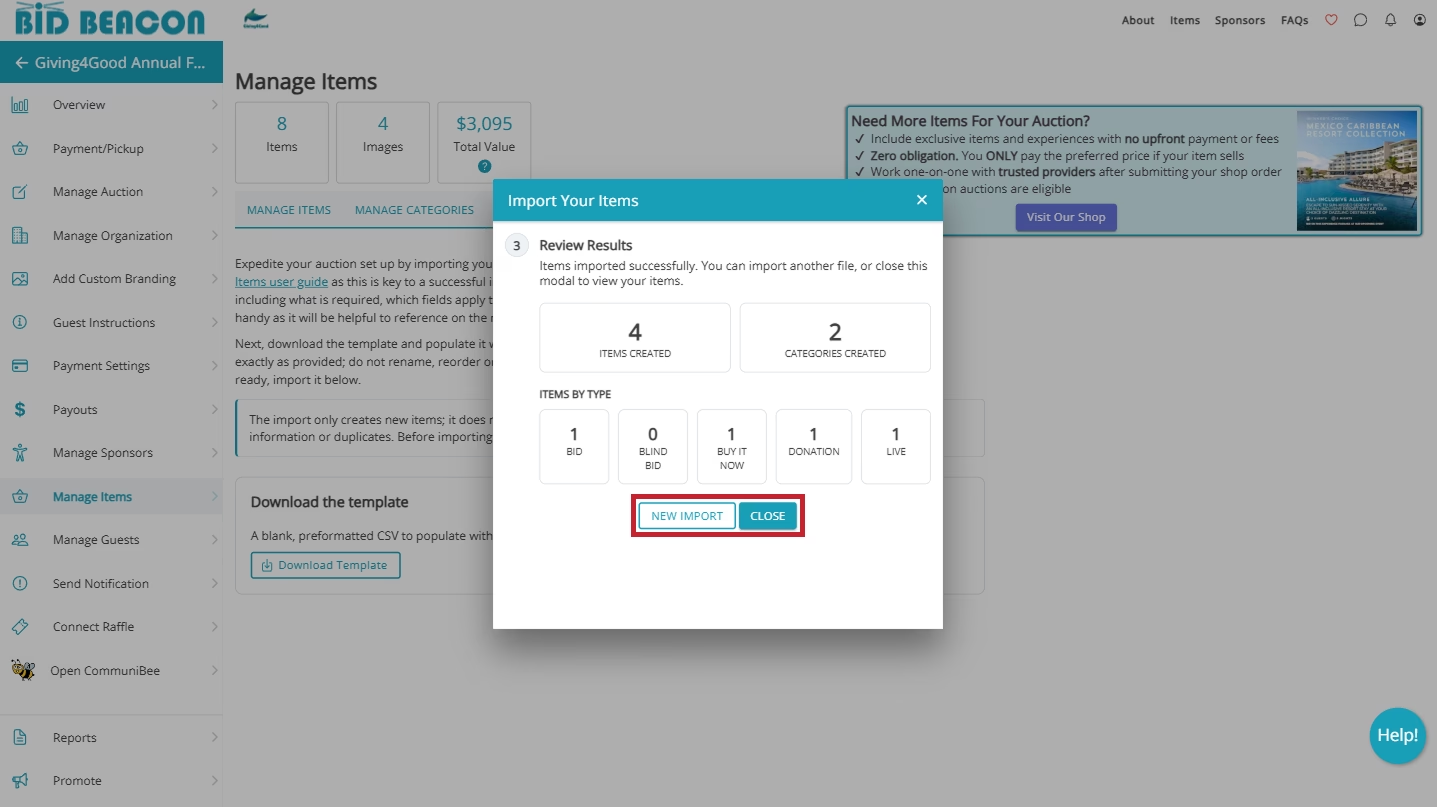
After Importing
When your import runs successfully, a Review Results modal will appear, highlighting the total number of items created, categories created, and a total count by item type. To proceed, click Close or if you have another file to upload, click New Import.
If the import fails, a separate modal will pop up that references the row number and a brief description of the issue. Once you correct the issues, reupload your file and try again.
With your newly imported items, you can quickly upload images for each item directly from the Manage Items tab. Use the Images column within the table to add images in bulk for each item. Clicking Quick Add will allow you to select up to 10 images at once, which can be repeated if you need to upload more images for an item.
When uploading multiple images at a time, they will be ordered alphabetically by file name, but you can adjust the order by clicking Edit. Please note that images cannot be larger than 10MB and must be one of the following file types: .JPEG, .JPG, .PNG, or .WebP.
Once your items have been imported and images added, a best practice is to use the Export Item Setup as a final check to confirm all items are correctly set up. Rather than clicking into each item to review individually, you can quickly scan all items and fix any errors before going live.
Copy Past Items
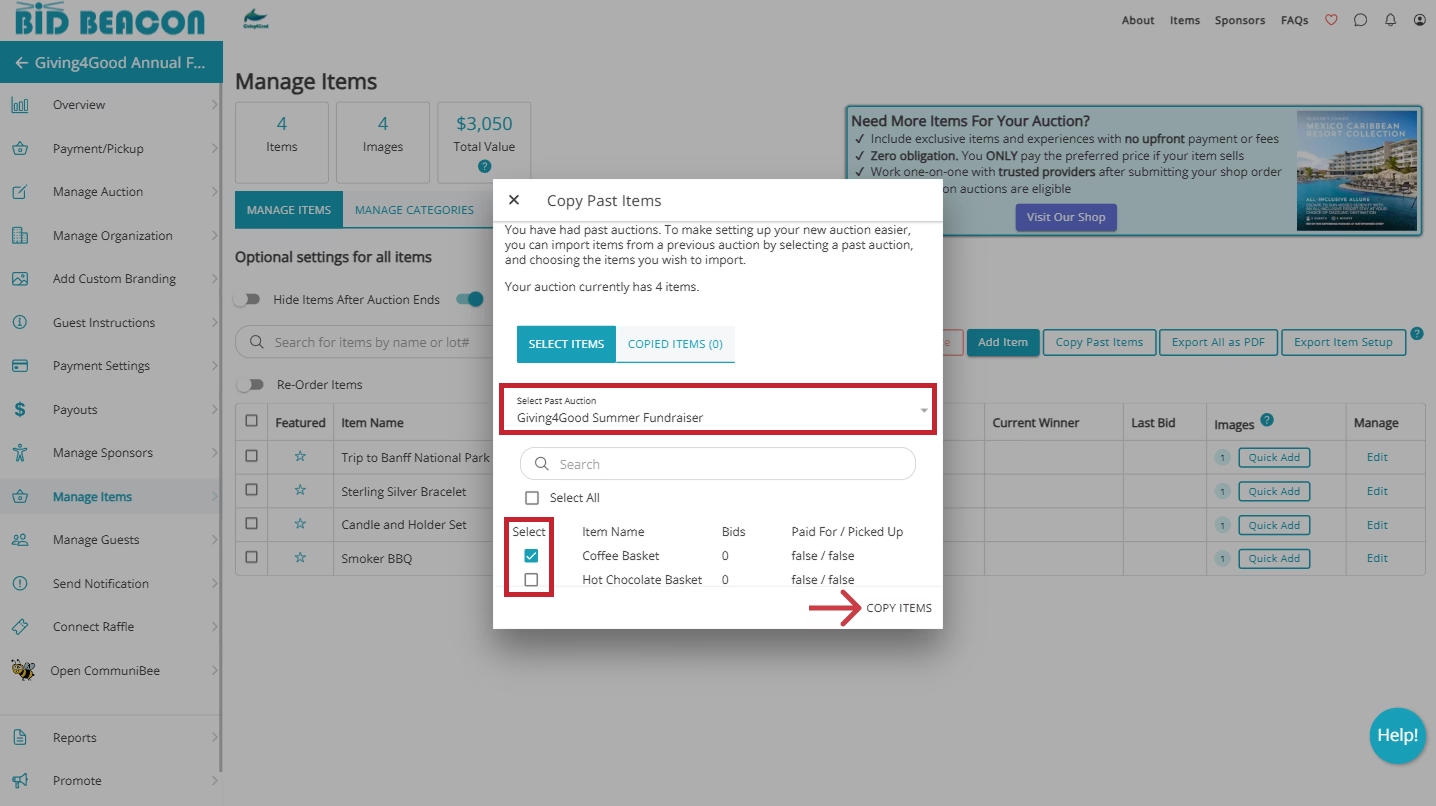
If you plan on using the same items from a previous event, you can copy them into your new Bid Beacon event.
Navigate back to the Manage Items tab and click Copy Past Items.
Click on Select Past Auction dropdown to view your previous events.
Choose the event you wish to import items from. If you don’t see your event, make sure that you were an admin of the previous event, and 2) make sure you logged into the correct Bid Beacon account.
A list of items will appear. Under the Select column, check off all the items that you want to import, and then click Import.
A Pending Item Copy popup will appear:
- Click Yes if you are done selecting items and want to copy them now
- Click No to cancel
- Copied items will include information from Images/Media, Item Details, and Donor Information.
- Copied items will exclude details from the Bidding Window, and Fees And Taxes sections, so be sure to edit these as needed afterwards.
Bulk Delete Items
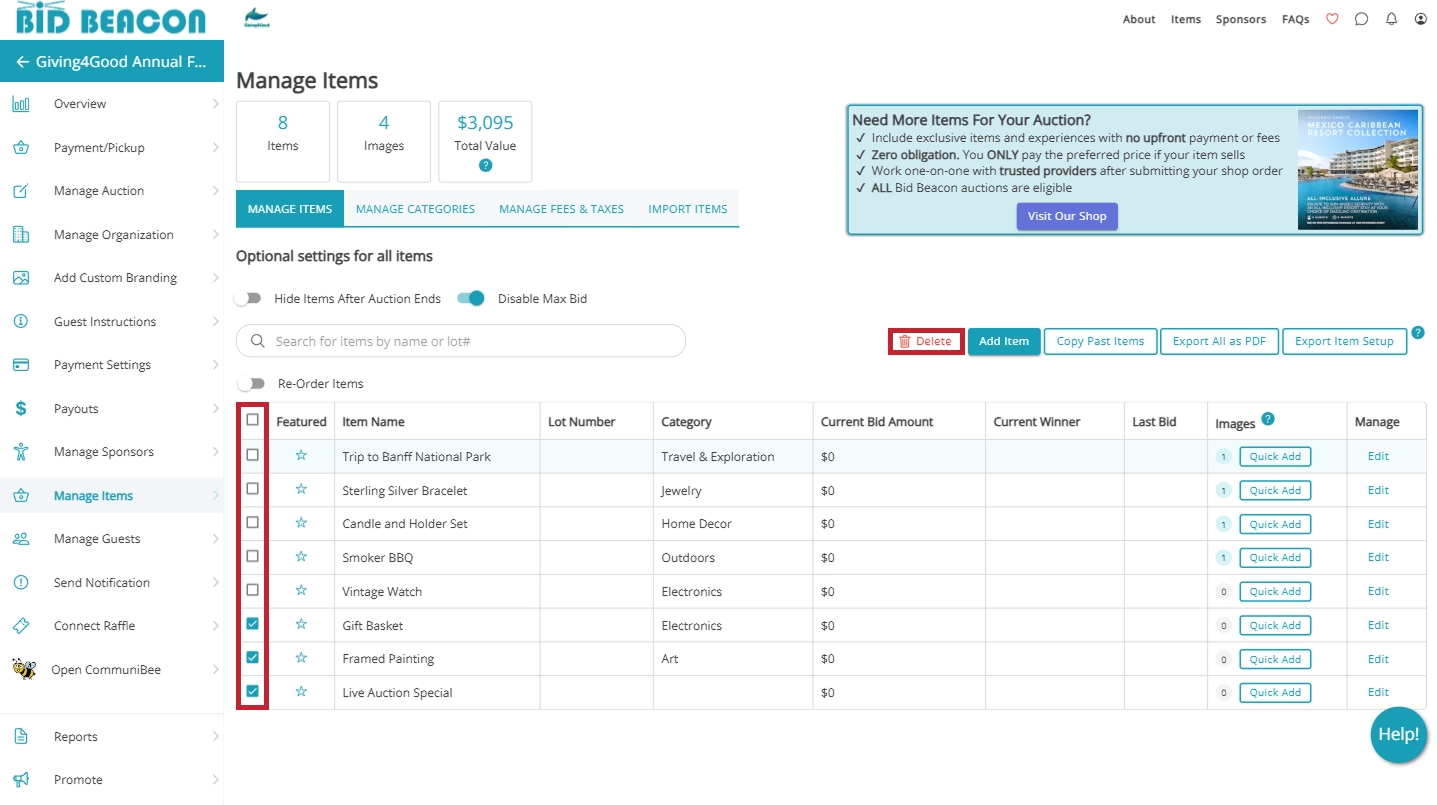
After adding your items, if you find you need to delete a few, you can quickly do so with the bulk delete feature. On the Manage Items tab, use the checkboxes on the left side of the table to mark items for deletion. Once the items have been marked, click the Delete button above the table.
Please note that once your auction ends, you will not be able to delete items.
IMPORTANT
If you are using Stripe as an online payment processor, please ensure that every item you upload abides by Stripe’s Services Agreement – Prohibited and Restricted Businesses. If any of your items fall under the list of prohibited or restricted businesses, Stripe may restrict and close your Stripe account.